Photography Tips
01: Learn fieldcraft tricks
While good equipment is pretty much essential for wildlife photography, good field craft makes a bigger difference to getting a frame-filling shot or a wide angle habitat image. But a skilled hand behind any machine can use it to its full advantage. Knowing the behavior and habitat of the animal you’re photographing is key. That might sound like we’re stating the obvious, but the best wildlife shots are rarely taken on the spur of the moment. Wear camouflage or neutral-colored, rustle-free clothing, ditch the deodorant and be on the spot when the animals are most active – that’s usually dawn or dusk.
02: Use of vehicle in photography
Getting close to wild animals and birds is the most difficult part of wildlife photography, that’s why a hide or blind is an essential part in the professional wildlife photographer’s kit. One solution is to turn your car into a mobile hide. Wild animals are surprisingly tolerant of vehicles, although you’ll still need to avoid sudden movements once you’re parked up. For the sharpest shots, use a beanbag to support the lens on the vehicle’s frame, activate the camera or lens’s stabilizer and switch the vehicle’s engine off to stop any vibrations.
03: Taking photos of birds in your garden
Click…click…click…practice makes perfect. A good way to get to grips with the basics is to photograph garden birds. The trick here is to set up your own garden bird studio. Clamp a branch in place in front of an uncluttered natural background; hang a feeder close by and, over time, birds should start using your branch prop as a landing post before heading to the feeder.
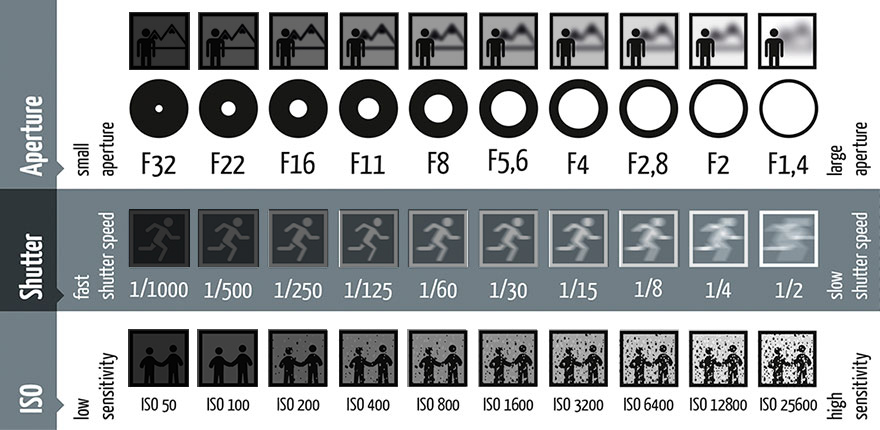
04: Practice at the zoo
Zoos and wildlife parks provide the perfect opportunity to hone your mammal photography technique, but you’ll usually have to shoot through wire fences chain linked enclosures. Getting as close as possible to wire fences, focusing on animals that are far away from it and using a large aperture to create a shallow depth of field can make the wire fence almost imperceptible.
05: Take eye-to-eye animal portraits
Make the effort to get down to an animal’s eye level as this will result in a more intimate portrait. Manually choose an autofocus point that corresponds with the animal’s eye, too. If you leave it to the camera to select an AF point it’s likely to focus on the part of the creature that’s closest to the camera – and that’s likely to be a snout, a beak or claws (depending on how close you’re getting!). Challenge yourself to shoot at a wider angle to give the viewer a better idea of where you took the image and where your subject has to carve out a living in the wild. This is applicable to any species you photograph – from the squirrel to the deer to the elephant.
06: Panning with animals and birds
Panning is a technique where you move the camera and lens to follow a moving animal. The idea is that the subject stays more or less in the same position within the frame, so they appear sharp in the photo, while the moving background is recorded as a blur (as long as the shutter speed is slow enough). It’s an essential technique to master for birds in flight photography. Using a tripod fitted with a ball head can help to ensure that the pan is as smooth as possible and the image is sharp where it needs to be. If you’re shooting handheld, a lens fitted with an image stabilizer that has a panning mode will help.
08: Better composition
With wildlife photography, very often it’s a case of nothing happening for ages and then everything kicking off all at once. Composing pictures quickly can be a challenge, but there are a few tricks you can use. Off-Centre compositions are often recommended for more balanced images, and that’s particularly true if the animal is looking to the left or right. Compose the shot so that the creature is off to one side and with more room in front of it to ‘look into’ than behind it. When it comes to positioning the animal off-centre, use the camera’s AF points in the viewfinder as a guide. Alternatively, activate Live View and use its 3×3 grid display. Position the entire animal, or its most important feature, where the lines on the grid cross. Try improving your photo composition by cropping the shot later in your preferred photo editing software. Try to keep the original aspect ratio, as this will help you develop your eye for stronger compositions in-camera.
09: Use manual metering for consistent exposures
Many animals have either very dark or very light fur or feathers and this can cause problems for a camera’s metering system. Dark subjects can come out looking too light (overexposed), while light subjects can appear too dark (underexposed). For consistent exposures, switch to Manual metering, point the lens at a mid-tone subject in the same light, such as patch of grass or a rock, and adjust the aperture and shutter speed until the exposure indicator lines up with the ‘0’ on the exposure scale in the viewfinder. You can now recompose your picture and be sure that the animal should be correctly exposed.
10: Sharper photos with a proper support
A big, heavy telephoto lens requires a big, heavy tripod and specialist tripod head if you’re going to get shake-free shots. However, lugging this kit around can slow you down – a good thing for considered compositions, but another thing entirely when it comes to following an active subject. If you need to do a lot of chasing through the undergrowth, do what sports photographers do and use a long lens on a monopod. What you lose in the stability that three legs provides, you gain in mobility. Treat a monopod as another weapon in your arsenal rather than a substitute for a tripod and you won’t go far wrong. Bean bag is a perfect choice for those locations where there’s not always enough space to set up a tripod or use monopod, such as at the national parks where more flexibility required. This helps you making perfect and crisp images.
11: Safe shutter speed for handheld photography
For sharp handheld photos, you shouldn’t let the shutter speed be any slower than the equivalent focal length of the lens being used. If you do, you run the risk of blurred photos through camera shake. On a full-frame camera, you can just use the actual focal length of the lens as a guide – if you’ve got a 300mm lens fitted, then the minimum recommended shutter speed for blur-free pictures is 1/300sec. An APS-C has a crop factor of 1.5 or 1.6, so the lens’s focal length needs to be multiplied by this amount for the ‘safe’ handheld shooting speed. The same 300mm lens fitted on an APS-C body would need a shutter speed of around 1/500sec for sharp handheld shots. Obviously this is just a rule of thumb, and the actual speed you need depends on your handholding ability, whether the animal is moving or not, whether the lens has stabilization and whether you’re able to brace the lens on a fence, tree or railing.